


Builderfly is a complete ecommerce solution that lets you create an online store, add products, choose templates, upload pictures, process orders, create CMS pages, offer discount coupons, build powerful mobile application, sell everything online at one platform, get tips to grow business, and manage the online store. It is a complete do-it-yourself platform to build a beautiful online store as well as iOS & Android app, with the power of Artificial Intelligence (AI). You can create a complete custom store and a personalized native iOS & Android apps without being a technical expert. Moreover, you can design your store your way and focus on selling products to the maximum customers.
What is a CMS Page?
A CMS Page or a Content Management System Page is an integral addition to the success of the majority of the online websites; especially online ecommerce stores. CMS in the ecommerce store helps in the creation, management, and designing the online store. The major management of the CMS page includes the management of the products to be sold in the online store.
Major ecommerce organizations use CMS to empower their teams to deal with their website’s content. This implies a critical cost reserve for the long run. Also, a CMS for an ecommerce site empowers you to work with a completely featured tool without the need for custom coding anything. So as to make a consistent shopping experience on your ecommerce websites, we must effortlessly include, update, and deal with every segment of our online store. The correct CMS permits us to deal with our order as well as products and customers, discounts, and promotions. Scalability and customization is another essential key ability that must be viewed when creating an online website. Running an ecommerce online store ought to be easy, and that can be accomplished with a CMS. In case you are hoping to connect to your online audiences, you have to make an instinctive and compelling online store to get them to purchase, return, as well as refer your store to the rest.
In view of this importance of including the CMS, Builderfly offers you to create CMS pages for your online store effortlessly. You have the complete power of customization with ready-to-use themes and templates. Moreover, you can give the look and feel you desire to your store by customizing the CMS pages you create. You can create as much as CMS pages as you wish for your store. All you need to remember is that only a single CMS page can be created with one particular tile. You’ll need a unique page title for each CMS page you wish to create.
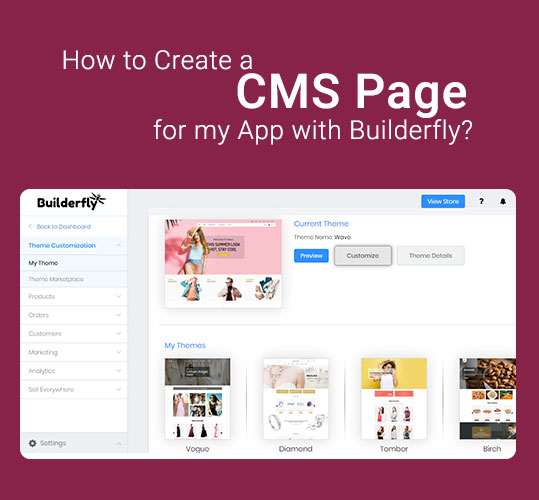
How to Create a CMS Page for my App with Builderfly?
Creating CMS pages with Builderfly is a quick and easy process. Below are a few steps by which you can create a new CMS page for your online store with Builderfly:
- Log in to your store or create a new store from www.builderfly.com.
- Go to the Manage Store section from the Store Front dashboard.
- Click on the dropdown menu of Theme Customization.
- Choose My Theme.
- Click on Customize option.
- In the Store Design Section, you can add new CMS pages by clicking on the Add Page icon from the Navigation Bar.
How to Manage Content for my CMS Pages in Builderfly?
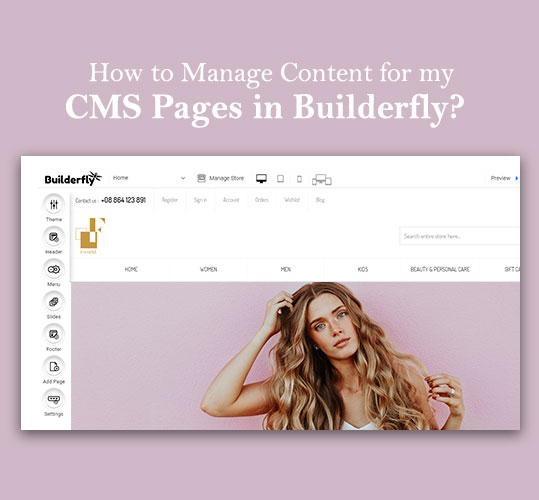
Builderfly is a fully customizable do-it-yourself platform that lets you personalize your online store. As mentioned above, once you create a CMS page, the following are the ways by which you can manage the content for your CMS pages in Builderfly:
- You can choose to create a Blank Page, About Us Page, Contact Us Page, 404 Page, Terms and Conditions Page, and Privacy Policy Page. Remember, you cannot create multiple CMS pages with the same name. Every CMS page title must be unique.
- In the About Us, Contact Us, and 404 pages, you get access to ready-to-use templates.
- When adding a Blank Page, the following are the details you must:
- Enter Page Title
- Enter SEO details including Meta Description and Meta Keywords
- Choose the location of the page link from header or footer
- Once done, click on the Apply button.
- Your CMS Page is successfully generated and now is the time for you to manage the page content. As soon as the page is created it is open for you. Here, in each section setting, you’ll find the option to:
- Add New Section, wherein you get the option to Add Blocks such as Featured Products, Recently Viewed, Best Seller, Discounted Products, New Arrivals, Featured Categories, Blog, Instagram Feed, Twitter Feed, Text Section Template, and Slider Templates.
- In the Text Section Template, you can choose the templates for each section of the created page. You need to click on the Apply button in order to apply any particular template.
- When you click on the Settings icon from the section settings of the Page Title, you get the option to edit the section. The editing options include changing the page title, background image, and alt text for the background image.
- Upon clicking on the Page title, a popup menu appears from where you can customize the theme by editing the site title, font style, font size, font color, text fonts, justification, character spacing, line height spacing. You can also click on the Reset to Default tab to reset the changes you made.
- The title section can be dragged to adjust the size of the section. You can even adjust the size to make it a complete CMS page excluding other sections of the page.
- Similarly, for other section settings, apart from dragging the size of the section, you get all other customization options such as changing the background color or image, changing the image of the section, entering the section title, entering the section content, entering the link text, and entering the link URL. Also, by clicking on the text settings, you can change the font, size, and color of the content from the pop-up settings bar.
- In the section settings, you can choose to Add More Block or Reset to the default settings. If you wish to save the settings, you must click on the Save button and if you wish to preview the same, you must click on the Preview button.
- When you click on Add More Block, you get access to the Slider Templates. IF you wish to hide a particular section, you can do so from the section settings of that particular block. Instead, you can add the sliders provided with the ready-to-use templates. You must click on the Apply button on the Slider Template you wish to use.
- By clicking on the arrow button in the section settings, you can shift the block upwards or downwards as per your choice.
- You can likewise add other CMS pages and customize the same as per the above-mentioned steps. Each section has separate section settings by which you can manage each section effortlessly. In every section settings, there is a code editor from wherein you can edit the code of the section if you are well-versed with HTML and coding.
- The section settings also include options to add a block, move the section upwards or downwards, reset the section settings, hide the section, unhide the section, and delete the section.
- The footer of the newly created CMS page remains the same as that of your home page.
- From the Header Section, you can click on the drop-down of the CMS Page and choose to delete any created CMS page by clicking on the bin icon beside the desired page.
How does the Newly Created CMS Page Appear in the Front End of the Store in Builderfly?
In order to view the CMS page you created in the front end, you need to follow the steps mentioned below:
- Log in to your Builderfly Store and go to the Manage Store section.
- Click on the View Store button at the top right corner.
- Click on the name of the created CMS page from the Header or the Footer section and you’ll be able to view how the newly created CMS page appears in the front end of your online store with Builderfly.
Wasn’t it a cakewalk? Well, you must try it out for sure. If you are still not subscribed to Builderfly, you have a great deal, a 14-day free trial period! Do check it out!