


You can build your ecommerce website in 3 minutes!
Yes, that’s true. With Buiderfly, you can create an ecommerce store for your business within 3 minutes. To let it sound not vague, we are talking about building an online store, making it ready-to-live you can do it within a week, or even if stretched within 14-days.
Creating your store will not be a time-consuming job. But, customization of your store to make it live can cost you the tenure of 2-weeks. The rest also depends upon your dedication to your business.
Since Builderfly is a DIY ecommerce platform that hosts your ecommerce store on its cloud-based server, you don’t have to worry a lot about pre-requisites.
To start your ecommerce journey, all you need to do is, register your business on Builderfly. Let me take you straight to creating your account.
How can I register my business with Builderfly?
Registering your business with Builderfly is extremely easy. Go to our site and click on Get Started. It is a two-step process:
First step:
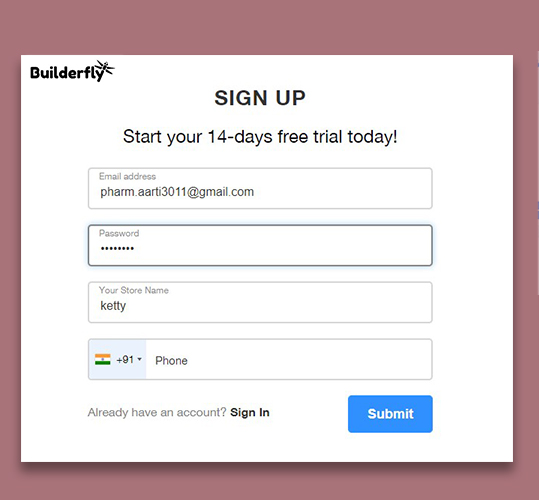
Add your registered mail address, create a password, the name of your store, and contact number. Once you verify your business with your contact number, the first stage of registration will be over.
Second step:
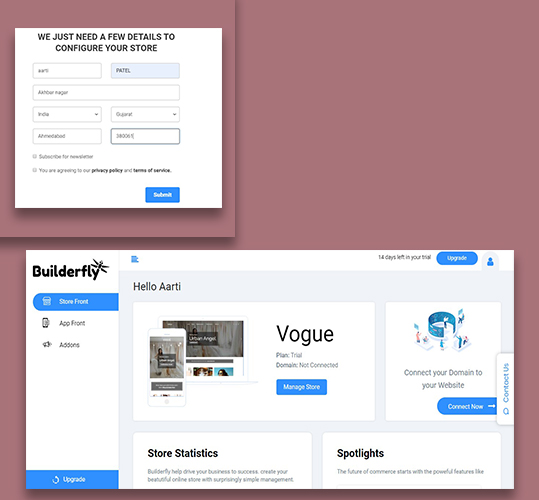
Here, you need to add the personal details of the business owner like name, address, location of business conduction, target industry.
Once done, you will get access to your Builderfly dashboard. From here, you can navigate to an online store builder, mobile app builder, and internally you can link other ecommerce channels to streamline your business activities.
To view your store, click on Online store builder. In the new window, click on the “View store.” This will open a fully functional ecommerce store, created with your business name.
Congratulations! You have your store ready.
How can I personalize my ecommerce store?
Since professional web designers already create the design layout of your ecommerce store at Builderfly, the experience of creating your online store will be swift and more straightforward for you. Here, we will be talking about feeding your website’s CMS with all the content that you need to display in your store. This is how you will start updating the back-end of your website.
- Choose your theme:
The first and foremost thing is the selection of a theme that suits your business niche and entails the story of your brand. If you choose the target industry of your business, you will get the theme of your store that suits your business. If not, later, you can choose the theme of your choice. Go to the Builderfly marketplace, where you will get all paid/ unpaid themes listed. Click on Apply, and your theme will be added to the theme section of your store. Keep in mind; your content may get affected by changing the theme. So, we recommend you to finalize the theme for once.
- Update your catalog:
Updating your catalog can be a time-consuming job unless you have a handful of products to list. Builderfly allows you to list your products individually as well as in bulk. From the import/export product section, you can download the excel sheet with all the required attributes and complete the excel sheet to update your catalog in a single go. While updating your catalog, remember to add high-quality images of the product, clear and concise product description and title for the product detail page, and update SEO for each of your listings. The selection of related products will be helpful to up-sell your products.
- Categorize your products:
You can add/remove the product categories as per your business category and products in the catalog. These categories will help you manage the product category pages in your store. It will help your customers to search for a particular category to purchase the products of the same class. Thus, it will ease the shopping experience of your customers.
- Update taxation rules:
In this section, you can update the taxation rule as per your region and governmental orders. By updating the tax slab as per the category, the tax will be automatically deducted and displayed in the invoices generated for your orders. The automation of this section can save your time and efforts of manually generating and managing taxes for each of your product categories. You can create the custom tax classes for your ease.
- Integrate payment gateway and shipping partner:
If you don’t integrate the payment gateway to your store, you will not be able to receive payment for your orders. And, in the absence of your shipping partner, you will not be able to share the shipping status for the business. From the Sales section of your store builder, you can update the shipping partner and payment modes that you can enable at your store. Here, you can update multiple shipping addresses and list the rates for auto calculation as per the order value, distance, and weight of the product. In the payment section, you can enable online and offline payment modes at the same time. You can update the credentials of your merchant account and integrate the bank account to which the amount must be deposited. The cart and checkout settings will also be updated in this section.
- Blogs:
The blog section at your website is provided to share the quality content with your users to improve the engagement of your store. By educating your customers, you can contribute to the community and build your audience. You can categorize your blog as per the topics of your choice. Here, you can also update news and media coverage of your business to grow the reliance of your customers on your business.
- General settings:
Under sales, in set-up, the general settings for the successful conduction of commerce business can be managed. You can list all the mail addresses and contact details required to manage the orders and queries from the customer-end. At last, in the settings section, you can update the working hours of your physical store, if any, and contact timing for a quick response.
How can I make my web store ready to launch?
Now that you have updated the back-end of your store, we will help you in customizing the front-end of your store. From “Online store Builder” on your Builderfly dashboard, click on “Customize Store” to customize the front-end of your store. If you are worried about the common look of your store, you need not bother. We have professionally designed ready-to-implement templates for different sections of your web pages. You can go through each of them one-by-one and customize the look of your store as per your choice. We grant you access to HTML/CSS code as well, so you can customize the existing layout with the basic HTML and CSS tricks.
- Home page: Call it the face of your business, as it will be responsible for showing the first impression of your business. Our WYSIWYG editor enables you to make live changes in your store. With the help of sliders, menu, header, footer, you can update each section of your home page. If you like to add/remove any section on the home page like ‘trending products, ‘best buys’ etc. on your store, you can do so by clicking on the settings sections shown between the sections.
- Static pages: The static pages of your online store include pages, namely About Us, Contact Page, 404 error page, help section, FAQs, and policy pages. By clicking on “Add Page,” you can add all the static pages for your ecommerce store. You will get a ready-to-add template with the essential content on each of these pages. You can replace the content of these pages or create it distinctly from your end; it’s your choice. When you are using the available template for questions to be added on FAQ, answer them as per your offerings, as it can affect your brand value in the later stage.
- Policy pages: Though policy pages also come under static pages, we like to talk about them distinctly as they are very crucial for any business. It includes the page of terms & conditions, payment & refunds, returns and cancellation, and terms of services. You will get the template for each of these sections along with the basic content for each of these sections. So, you need not bother about all those legal terms, which are a must for your e-commerce store. However, you must update these policies as per your requirement. You can mention the return window for the products in the policy. It will help you handle the situation of mishap and online frauds.
- Dynamic pages: All of your product detail pages, shop sections, and product category pages are the dynamic pages for your ecommerce website. You can update them by clicking on catalog, product category pages, cart, and checkout.
- Miscellaneous settings: From the settings section, you can choose the layout of the website, social media profiles to be updated, robots.txt, check performance, link Google Analytics, Google Adwords, Facebook Pixel, update custom CSS and JS file to make the most out of your business.
This is enough to launch your business successfully in the market.
It’s the time to make your store live! Launch now!!!
To check the features that can help you on the marketing front, you need to drive back to the back-end section of your store. Our step-by-step user guide can help you through each of these sections. If you still feel stuck, you can write to us at support@builderfly.com.